Dynamic range is the scale of tonality from darkest to brightest in an image. In general, it is better to have a longer or deeper dynamic range in an image to start with. The Nikon Compact Digital cameras at ISO 100 have a dynamic range of about 446:1. That means the digital imager captures and delivers an image made from 8.8-stops of brightness.
That fits pretty well with the sweet spot of film's dynamic range but film has a beautiful habit of rolling off the brightness and slowly thinning out the shadow detail giving the image a longer dynamic range and a very pleasant visual quality.
Not all images need this level of dynamics but when extremes are encountered, it's nice to have a way of capturing a greater scale of brightness.
How would we do that with a camera that only captures the middle of this range? We use this special technique. It doesn't work with moving objects (darn) but it can be done with things that are stationary.

Top, middle and bottom images in this order are easy to manipulate in Photoshop.
First, shoot a series of images from a locked-down tripod. One exposure each of -2.0 EV, Normal and +2.0 EV. Exercise special care not to twist the camera between shots. The images need to stack on top of each other pixel-perfect.
Interestingly, the new Coolpix 995 includes a feature that allows you to capture the frames needed for this idea directly. Use the setting for 5 auto-bracket exposures at one stop apart. The darkest, lightest and middle exposures are used with this method:
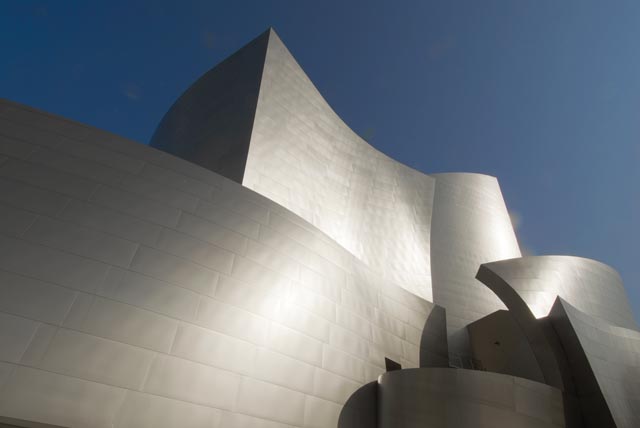
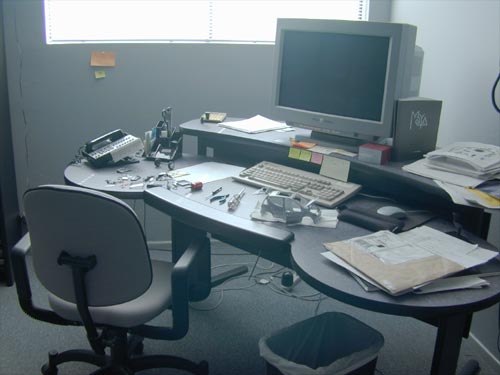
The example here was chosen for its extreme contrast. The center, normal exposure shows several limitations. The window has zero detail in it because the brightly lit outdoors is over the top of the camera's dynamic range. Similarly the shadow detail under the chair and desk shows no differentiation because detail here is under the imaging chip's dynamic range. Each of the other exposures capture more detail above or below the range of the center shot.
To the photographer making the shot, his eyes saw the outside scene as being bright, the way one's eyes react when coming out of a movie during the day, but he also was aware of abundant shadow detail, even in the legs of the office chair. This is not unusual for human vision. Our eyes operate over a 30,000:1 dynamic range, typically*. No film or print could possibly show this, but we are about to get a lot closer.
When the bracket of exposures was made, the highlight and shadow detail was brought out, but not on the same image. Now we will combine the images in Photoshop to bring the best parts of each exposure into the final result.
Stack the images over each other with the lighter images under the darker ones. Now we get tricky.

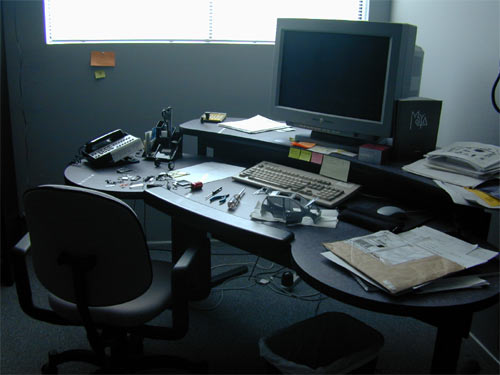
Overexposed +2.0 EV image alone after processing to bring up shadow detail.
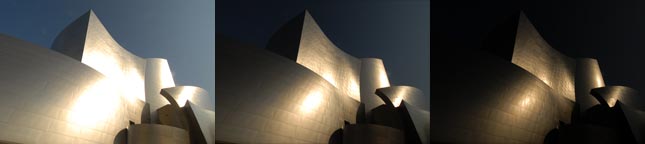
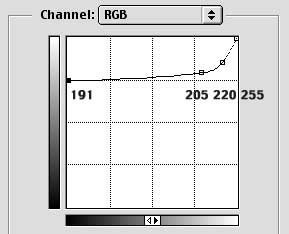
Using the Curves control, shape the brightness curve of the brightest image, the one under the other two, so its lightest part is only about 35% of the full dynamic range of what it was originally (90/255ths). (When the file is first opened, the curve is a straight line at a 45 degree angle.) Then with a few mouse clicks we reshape the curve similar to this:
Photoshop Curves menu set to bring up shadow detail.
Since each image may require a different tweak to produce the results you desire, it is helpful to have the middle layer on during the adjustment of the bottom layer. The transfer mode of the middle layer should be set to "Screen". This allows the two layers to combine in the same manner of a double exposure on film. The subtle tones of the very dark version of the bottom layer now adds its shadow detail to the overlaying, but darker, normal exposure.
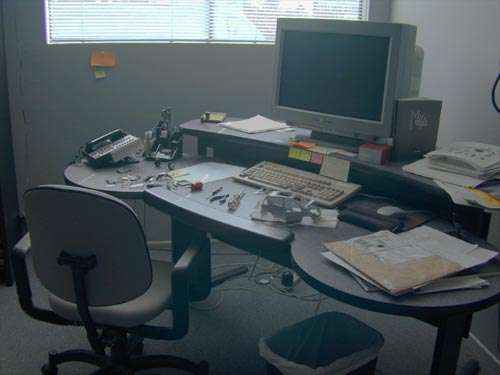
The middle and bottom layers combined now look like this: Note that the normal exposure isn't changed in any way except for the transfer mode.
Normal and +2.0 EV overexposed frames combined.
Compared to the normal exposure above, this shows a marked improvement in the shadow detail. But now the middle tones are too bright. The next step is to do the reverse procedure with the underexposed image. It will be blended with the underlying pair by using the "multiply" transfer mode. Multiply creates the effect of laying one transparency on top of another. When seen by itself, this layer will now look somewhat like this:

Underexposed -2.0 EV frame with curve applied.
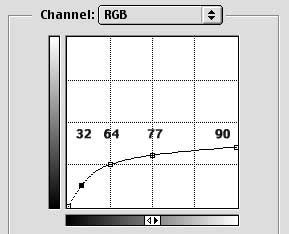
The only thing we need from this layer are the very subtle shadings in the brightest highlights. Detail out the window which was illuminated in bright sunlight is still visible, but no detail is seen below a particular threshold. The Curves control adjustment that gave this result looks like this:
Photoshop Curve Menu set to produce increased highlight detail.
As with the bottom layer, it helps to have the other layers on during this process so you can judge how much highlight detail to add.
When the whole operation is finished, the scene will be lower in contrast because now a lot more dynamic range is being squeezed into the same display range your monitor started with. This example now has detail from the bottom of the chair to the roofs of buildings in bright sunlight. It now looks like this:
The final extended range scene has greater dynamic range than film.
The final image has been improved in white balance and with a boost to the chroma level to recover the saturation of objects in the original scene. From the building, trees and bright daylight of the exterior to the dark recesses of the waste basket below the desk the dynamic range has been dramatically extended. From this master image, further manipulation may be made to enrich the contrast or manipulate the image to taste.
Compare the above image with the normal exposure directly from the camera (below). For many purposes a normal exposure is just fine. When an image needs greater dynamic range, this technique will achieve it with the Nikon 990 and 950 digital cameras.
The original "proper" exposure alone.
Automate the entire process in Photoshop. The iNovaFX filters and corrections files located on the CD that holds the eBook will automate this correction process once you have stacked the original images over each other in Photoshop. By slightly tweaking the curves in the top and bottom layers, you can finesse the image to your taste. Experiment with the final image to achieve nuances of tonality and contrast that fit your subject better.
It may be helpful to try images that are farther apart than just two f-stops. Experiment with different color tints to the over and underexposed images. This technique is the starting place for a number of interesting additional techniques that you can discover on your own.
Next? We clean up the desk.
(End of original Article)
*Human
eyes have about a 1,000,000,000:1 absolute range from fully adapted
dark vision to fully adapted snow conditions at noon on the equator.
But when we are adapted to a normal working range we see about
a 30,000:1 range of brightness values. The amazing dynamic range extending iNovaFX
filters (seven variations) are just one of the features in the
Mastering Nikon
Compact Digital Cameras eBook, Sony eBook and DSLR: Nikon D70 e Book.