|

 Control Freak Control Freak
Button,
button, where is that button? Over here, no, over here. Ah, here
it is. The outside of the lens has 6 buttons and the number of
controls divided between your thumb and index finger of your
right hand are 17. That could have been a problem had the Sony
Ergonomic Olympic team not been so on the ball.
Your index
finger has only four controls to encounter but these do a lot.
The shutter, of course, and the EV+/- buttons are logically joined
via a geared wheel called a Jog dial that selects things by rotating
and confirms choices by being pressed downward. I've seen this
on my video equipment, and it's a very swift way to make choices
and lock them in.
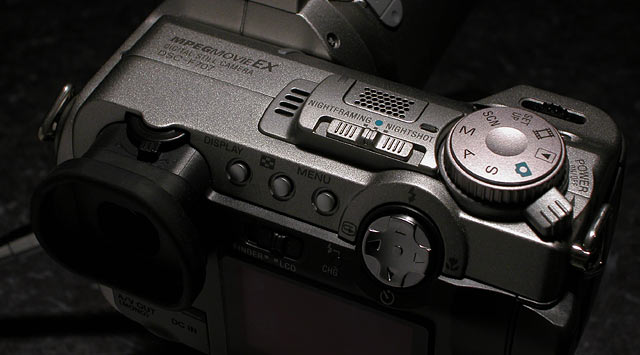
The Night
Framing and NightShot options are selected with a sliding switch
on top of the camera. Jumps between choices are virtually instantaneous
on the monitor, making operation logical and quick.
Your right
thumb works everything else. Menu, review mode and text overlay
on/off buttons line up in a row. A switch selects between EVF
and monitor. Since there is no optical viewfinder, you must use
one or the other. Of the two, the exterior monitor uses the most
power.
The King
of the buttons is the five-way "Control button" that
is part four way joystick and part push button. It chooses quick
review, flash type, macro and self-timer most of the time and
does double duty as a scroll control in magnified review mode.
Your thumb
kicks the camera on and off with a momentary toggle that extends
from the base of the Master Mode dial. It selects Manual, Shutter,
Iris and Program AE exposure modes, Playback, Movie, Set Up and
SCN, or Scene, functions.
A dedicated
button initiates EV+/- adjustments, and a clever geared wheel
rotates and pushes for scrolling and ratifying choices. It sounds
complicated but it is well thought-out and ergonomically sound.
You will learn it in no time.
In this
view, the only thing that differentiates the 717 from the 707
is the Mode dial at the right. The 717's version adds only one
extra icon to this control--"Full Auto" mode that is
differentiated from Program AE mode. Perfect for beginners, it's
a mode that requires no experience from the photographer. Great
for when you hand the camera off to a novice.
Glare Repair
The exterior
monitor is COATED! Yay! A deep blue anti-reflection coating keeps
the glare out. But unlike earlier Cyber-shot cameras, this one
doesn't work in sunlight doing the reflective image trick. Aw.
Well, with the EVF, you don't need outdoor viewing at all.
You have
control over the brightness of the light source behind each of
these view screens separately.
For bright
outdoor use, elevating the brightness of the EVF makes it quite
well suited to your daylight-adapted eyes. The miniature TV screen
in there works great in bright sun and is detailed enough to
deliver all menus and icons into your eye.
The monitor
can fool you. Its image can look better than it will on your
computer screen, especially with underexposed images. (Never
fear, the coming iNovaFX Photoshop Actions for the 707 will retrieve
underexposed images and even extend camera exposure usefulness
into the ISO 1600+ realm. But I digress...)
Macro Encounters
Sony includes
a Macro mode, but the smallest practical field of view is only
about 1.2 inches (3cm) wide. Its sweet spot is at the wide end
of the zoom, not a great place for flat field, undistorted, macro
performance. The sweet spot extends about a quarter of the zoom
range.
At full
zoom, macro focus works the 0.9 meter range. Just arm's reach
away from the front element. The field of view is only 7 inches
wide (18cm), but the focus field is flat and quite undistorted.
Moving the zoom to mid way, close focus shrinks the distance
to a comfy 0.07 meters. Field of view has shrunk to 2.25 inches
wide (about 55mm).
It will
be useful for many things, but not the extraordinary macro performance
of the Nikon Coolpix line.
Move Ease
Still cameras
have grown a motion picture component. It was inevitable. Movies
are only a stream of still images, after all. But the trend toward
acquiring motion scenes with digital still cameras blurs the
lines, so to speak.
 The movie modes of the
707 include a very high quality image and sound mode plus several
lesser modes including one called "Clip Motion" that
has virtually nobody excited. Largely through unawareness. The movie modes of the
707 include a very high quality image and sound mode plus several
lesser modes including one called "Clip Motion" that
has virtually nobody excited. Largely through unawareness.
Here's
a ClipMotion image made from 10 (the maximum) controlled "frames".
You may find a way of using this for web pages. It produces an
animated .GIF file right in the camera, and embeds into html
pages easily.
To edit
a file, you will need Photoshop and ImageReady or another animated
GIF editor. The default time for ClipMotion files is 2 images
per second. Editing inside the camera isn't available.
To date,
I have heard of nobody using it other than this demo. Clever,
though. With Adobe's ImageReady, you can, of course, make these
sorts of animated GIFs out of any images you choose, add timings
to individual frames, optimize the output and post them on the
web.
Omissions
IR shooting
in NightShot mode lifts the IR filter from in front of the imaging
chip. It gets great IR, but insists that it is an Auto Exposure
Mode camera with the lens wide open and the shutter speed locked
out from exposures briefer than 1/60 sec!
Manual
exposure doesn't work with NightShot. If you cover the lens with
a nice IR filter, you can shoot outdoor IR photos with the F707,
but there is no way to turn off the IR illuminators under the
IR filter. They tend to glare off the filter surface.
The front
of the lens is threaded for 58mm filters and you would think,
"I'll just get a nice 1A and protect that puppy," but
both of the Night modes suffer from the reflections just one
layer of glass causes. The IR illuminators and laser focus pattern
projector all shoot from right next to the lens and inside the
filter thread.
For ultra
clean work, you will have to solve the brightness and glare issues.
The eBook gets into this quite deeply.
If you
shoot at night and NightShot is a possible option, take all filters
off the camera.
The Sony
DSC-F707 has no Contrast control, no Saturation control, no Best
Shot Selector (BSS), no 5-zone focus selector and no intelligent
hot-shoe. If you really need features like this, see the Nikon
Coolpix 5000.
Burst-3
mode, which is a very fast three-shot motor drive emulation,
solves the idea of BSS for me most of the time. One of those
three images will be clear if I have taken steps to stabilize
the camera as much as is practical. Saturation control is handled
in Photoshop, and the auto focus system of the 707 is easy to
work with. Using the wire-connected Sony flash unit has proved
easy and accurate, as well.
ABFAB Features
Sony's
design attitudes show up in the darndest places. They have, for
instance, in-camera editing operations nobody else can touch.
You can shoot an image at full size, decide later that it isn't
worth keeping full size, copy it to a down-converted smaller
format, and blow the original away, thus freeing up lots of storage
space and keeping the image at an appropriate size for your needs
--all inside the camera! (Emphatic redundant emphasis provided
redundantly!)
You can
rotate the image so verticals play as verticals on the review
screen. When you zoom into them, they jump up to larger size
for close inspection. At full zoom in, you are inspecting only
20% of the width and height of an image.
As you
zoom into closer views of an image in Play mode, you can see
the image in more detail. But if you stop, cropping a new composition,
you can save that new crop as a separate file. Of course, the
saved file will only be smaller than the originals, but it's
one of those "why didn't somebody think of that before,"
sort of ideas.
And if
memory space gets precious (I knew I should have bought more
memory gum!) you can go back to shots that were made at highest
quality and re-save them at the intermediate compression setting.
Then blow away the original. Voilá! More room. You could
do the reverse, as well, --save the image in a new file at lower
compression-- but that wouldn't do
it any good.
The AF
Lock freezes the exposure, pops an icon on the view screen and
holds it till the cows come home--or until you make the shot.
It's a hold/release toggle. You should play with the idea enough
to get used to it, in case you ever inadvertently lock the exposure
and can't figure out why the shot came out wrong.
The two-speed
zoom is a great idea. In-camera framing gains a huge degree of
refinement with it. The Manual focus is precise, consistent throughout
the zoom and makes controlled tripod or studio shots easy to
nail.
Pickup Lines
The testing
reviewers consistently see 1800 or more lines of detail in the
image in the short dimension of the frame. The same image will
define around 2400 lines in the long dimension.
That's
a measure of the number of alternating zones of either white
or black the imager will show before the pattern fades to gray.
Notice that this is different from film MTF tests that measure
line pairs.
How does
it stack up to film, everybody wanted to know? While you can
shoot film with the lowest ISO, highest acuteness formula and
get "better" results, the issue is nearly moot.
An ink
jet printer is now the trusty tool of professional film photographers.
And they shoot film mostly to digitize before printing. Any print
that is fed 200 or more pixels per running inch of paper will
appear to be of exceptional quality. This camera needs no scan,
delivers clean, sharp images and makes prints so tight that full-page
ads can be made with it.
With 1920
pixels to start with, 1800/1920ths is about 94% efficiency. Meaning
that Sony has achieved a good solid 'A'* rating in image detail.
*US grade schools use
an A B C D F(ail) report card system. A = the best.
Color and Tone
From example
images shot side by side with the Nikon CP5000, the Sony image
seems a tad more colorful, as if they had been more concerned
with "vivid" and less concerned with "accurate".
This sentiment has been echoed by others and while I sympathize
with their concerns, the real world of photography as witnessed
through thousands and thousands of exposures with this camera
through these Very Fussy Eyes has come to a different conclusion.
The image
is fine. Great, even. But it IS easy to screw it up in your computer
by using the wrong image viewing or color management files. And
that can make the image look too florid on your computer screen.
Try printing out a camera file direct from the Memory Stick and
you will almost certainly find that there is nothing at all wrong
with the color intensities.
 Photoshop 6 and 7 need
help. Switch to "Color Management OFF" and balance
your monitor to look more like a straight, non-managed print. Photoshop 6 and 7 need
help. Switch to "Color Management OFF" and balance
your monitor to look more like a straight, non-managed print.
Of course,
a lot of that depends on how tweaked one's printing processes,
viewing screens and computer colorimetry settings are. There
have been a relatively high number of user grumbles that the
Reds from the 707 are too saturated. The review camera, manufactured
in October, 2001, shows rich color, but not as strong as the
complaints seem to indicate.
Other reviewers
who do direct comparisons of identical scenes have noticed that
the color from the 717 is improved to avoid the red "issues".
Sony seems to listen. Check the details in DPReview's in-depth review, for instance.
Both of
these cameras will produce more realistic, life-like color than
any film I've seen. And why not, they both are direct scans of
the real world.
The red Che flag is in
the middle of a major labor strike in Rome, Italy, this past
March 2002. The flags were --piercingly-- brilliant red along
with the hats many strikers wore. This image was shot on the
fly from a moving bus (!), packed with standing riders (!!),
through a closed window (!!!), and is only sharp because the
camera used a 1/500 sec shutter speed. But the reds? No problem
there. At least not with the color red. Nor were any of
the other strike images shot with or without the window in the
optical path. That flag was about as intensely red as anything
you would ever need to capture, short of day-glow colors that
actually fluoresce. Of course, if it looks too red on your
monitor, then there's your answer. These are the original values.
Only size and crop were needed to bring this shot to this page.
Tonal Oddity
While the
dynamic range of the 707 seems to be extraordinary, looking more
like film than other cameras in its class, one strange phenomenon
seems to have affected a relatively high percentage of individual
samples. It shows up as a darkening along the left side of the
image and is virtually impossible to see in most shots. Still,
if one shoots a totally blank subject, such as a pure blue sky
or blank white light box, the left side of the image will be
somewhat darker than the right side.
In tests
of the review sample, this showed a consistent approximately
9% darker left edge when compared to the right edge. That's a
small portion of a stop, but the Sony eBook will contain special
Photoshop Actions (iNovaFX™ brand) that let you tune it
away to zero.
Noises Off
Images
shot at elevated ISO accumulate grain and noise. Elevated ISO
is derived by amplifying the signal from the chip along a specific
response curve and light objects show less noise than mid tones
and shadows.
A special
Twilight Scene mode elects to do a noise reduction gathering
of long exposure images. It combines a dark frame with the gathered
image and uses any light pixels in the dark frame as a template
to fill in the image. From making the iNovaFX filters I know
how easy it can be to get this wrong or marginally right. The
Sony DSC-F707 gets it very right.
Conclusions (with 8000+ images of ongoing
experience) +/-
+ On the plus side...
- Operational
speed
- Fast start
up.
- Fast auto
focus.
- Fast zoom/slow
zoom.
- Instant
access to functions with dedicated buttons
- White
balance.
- Manual
white balance.
- Meter
type.
- EV +/-.
- The huge
list of features that let you make pictures under nearly all
situations
- NightShot.
- Night
Focus.
- Laser
Hologram focus assist.
- Manual
focus ring with electronic focus magnifier.
- AE lock.
Then there
is the big lens, the image quality and the ergonomic layout of
the seemingly large number of controls.
Plus all
the clever in-camera editing options.
- On the minus side...
- Lack of
image quality controls such as contrast and chroma inside the
camera.
- Lack of
a daylight IR image function (so near, and yet, so what).
- No intelligent
hot shoe. Oops.
It's on the 717, so I guess they were listening.
- No true
B&W mode. Sepia gives you monochromatic viewing, though,
and that helps.
- Childish
"special effects." Except, of course, the Sepia.
- Odd left-side
darkening. Fixed
on the 717.
Bottom Line
If you
want a long lens zoom 5-megapixel camera, either model is very
hard to beat. I don't know of another camera that can best it
overall, dollar for value.
So many
great and intelligent features; so few excuses in its layout
and function. Image quality is far above average. Go to
a camera counter and touch it for real. If this camera doesn't
float your boat, a smaller, lighter, wider-zooming 5-megapixel
camera is available from Nikon and a new Nikon model brings 8:1 zoom and many attractive
features you may find to your taste.
The 717
has a handful of more features over the 707, and if you were
buying today, you could take heart in knowing that the 707's
that people are selling at a discount to clear out their "old"
stock is about 97% of the "new" 717 and takes pictures
that are every bit as good. Or, just wait until mid-October,
2002 for the new one. Might as well.
717 Recall?
Initial
production runs of the newer DSC-F717 camera encountered an "issue"
in manufacturing.
Ya gotta
love that sort of word. It really minimizes what it really means:
"Problem: big, hairy."
In this
case, certain cameras have a big hairy problem with the hologram
focus system and can fail to focus accurately, especially at
loger focal lengths. Only certain serial numbered cameras are
affected. Perhaps one of the manufacturing QC or adjustment stations
on the production line was miscalibrated. Anyhow, Mr. Sony slapped
his forehead and vowed to set things right.
Sony has
the fix, and will be glad to tweak your camera back to perfection.
Click here for the official list of affected serial numbers.
And thank
you, Sony, for being on top of the problem.
Other Reviews
DPReview's excellent in-depth full
review of the DSC-F717 finds details in color, image quality
and sensitivity that you should know. Click Here.
Imaging
Resource
reviewed the 717 with a deep analytical eye. And their standard
images--repeated for all cameras help you compare apples to apples.
Click
Here.
Steve's
Digicams
reviewed the 717. Click
Here.
More will
be here as the REVIEW evolves. Check back soon.
-iNova
PS: As experience
grows with these cameras, so will this review and the Sony eBook.
Available now on the order page.
© 2002 Peter iNova.
All rights reserved. Do not replicate or link to images without
permission. All photos by Peter iNova.
|


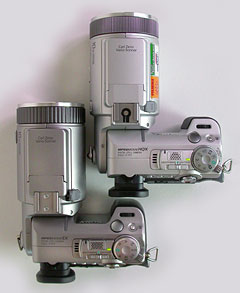 When you hold both cameras
in your hands, they feel the same in every way. Solid, moderately
hefty compared to smaller cameras, and positive in their control.
The 717 is one-half shade lighter in color than the 707 and the
grain of its finish seems tighter. That's an optical illusion,
since when you look close, they are actually the same texture.
When you hold both cameras
in your hands, they feel the same in every way. Solid, moderately
hefty compared to smaller cameras, and positive in their control.
The 717 is one-half shade lighter in color than the 707 and the
grain of its finish seems tighter. That's an optical illusion,
since when you look close, they are actually the same texture.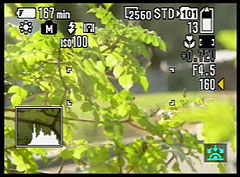 The
on-screen histogram turns out to be quite useful, too. Once on,
it's semi-transparent and it gives a pretty good accounting of
how the tonalities of the image are laying out.
The
on-screen histogram turns out to be quite useful, too. Once on,
it's semi-transparent and it gives a pretty good accounting of
how the tonalities of the image are laying out.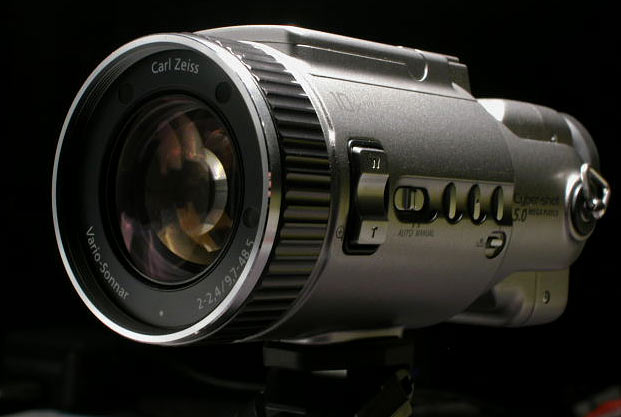

 IR Ready