|
Secrets of Digital Photography iNovaFX Filter Help for eBook 3&4 Owners Only |
Hot tips for the new filters.
Version 3.0 comes with a number of new filters. Here are some tips on how to get the most out of them. Also good info for Version 4.0 readers, too.
Actions? Filters? Which of these? The iNovaFX Photoshop Action Filters are what Photoshop merely calls "Actions". That's interesting. What Photoshop calls "Filters" are what they also call "Plug-Ins". Well, if Plug-Ins can be Filters, then Actions can be filters too.Both "filter" the image. In a real sense, the image passes right through them and becomes altered according to some method or set of orchestrated rules.
The big difference between them is that Actions orchestrate all the features already resident in Photoshop--including the Plug-Ins--thus achieving more filtering than a single Plug-In generally
does on its own. Some of the iNovaFX Photoshop Action Filters have over 100 steps, and many Plug-Ins buried inside that stack.
You can write actions, too. Or modify the ones that already exist.
Fix the Oil Painting!In the iComplexArtFX.atn folder there are three iNovaFX filters that still contain a single wrong instruction that isn't compatible with Photoshop 6.0.
Oh, they work just fine with Phtoshop 5.0 and 5.5, but not so well with PS6.
Somehow it sneaked by. But now the fix is in hand, so you can make the repair right on your computer and learn how easy it is to adjust a filter.
Rather than go through all the steps on this page, we have prepared a special iComplexArtFX fixer instruction page for you. Click here.
iFourPrint -series. These are utility procedures that let you open four images in either 2- or 3-megapixel format and either horizontal or vertical aspect, and combine them on a single letter page for printing.
Both US letter and A4 letter pages are accommodated.
The filter runs its course and even prints the page but not all printer drivers are totally cooperative.
You may wish to skip the built-in Print command and handle the page setup and printing manually. Nothing wrong with that.
But how can you disable that last printing step and keep the functionality of the filter?
Not hard at all. Open each of the four printer actions in the iFourPrint.atn file by clicking the arrow next to its name. A looooong list (40+) of steps opens up and way down near the end, about 80% of the way down, you will see...
Stop
...just like it looks in the picture above. The "Flatten Image" step may or may not be immediately above "Stop."
Un-check the boxes at the extreme left of these two instructions, and you will effectively turn the function off. The filter will now run without the Print command being issued.
When you run the filter now, it will make the 4-part image for printing and close the individual images without saving them, leaving only the image you wish to print. You can now setup and/or confirm the printing page orientation and print the sheet out.
Remember that the print position for these shots follows comic-book layout order. Meaning:
1 2 3 4
...for the horizontals
1 2 3 4
...for the verticals
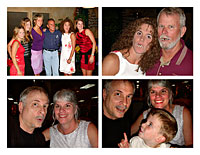
Like this cluster of family pictures gathered at a wedding party.
iMprove1 filter. Inside the new iFXxPS6.atn group is the iMprove filter and it is advertised as the "Panacea Filter" since it generally makes images better.
What it is, is a cluster of handy crowd-pleaser tweaks that tend to make people go, "Yeah!"
Roll your cursor over the image to see the before/after effect.
Of course, one man's panacea is another man's panatela, so this one wins the cigar by using photographic smoke and mirrors, not straightforward darkroom manipulation. It creates the illusion of greater contrast, sharpness and colorfulness.
It's a "feel-good" filter, not a photographic accuracy enhancer. Where it really shines is in a print. Try it with your printer to really judge the effect. On a web page it may look a bit too strong.
Just between you and me, the steps are these:
1. An overall fine detail sharpness tweak. Enough to crisp up sharp edges without bringing out too much grain or causing artifacts.
2. A "local contrast" enhancer that reaches out 55 pixels in all directions and performs an Unsharp Mask effect with only 15% strength. What this does is to give the image some snap without actually altering its full contrast range. Large areas stay where they were, while localized areas pick up the contrast boost. Your eye tends to zero in on the local effect.
3. A Saturation boost. Just fifteen measly points up, but enough to give your printer a more colorful outlook.
This is a slice from the middle of a shot reproduced at 1:1. Full size images will always look a bit soft, but the iMprove filter brings a lot more psycho-visual clarity to the image without running roughshod over the contrast and color.
iSharpPS6.atn. Here are a bunch of sharpness enhancing filters of various levels of usefulness. They are not for every image, by far. Some are for images shot without in-camera sharpness and they concentrate on the edges of areas of contrast in the image only. Thus avoiding sharpening the grain and compression artifacts in other areas of the shot.
The iSharpConcert filters perform a level of color denoise AND sharpening together. One is provided that is tweaked for 995/990 images shot without in-camera sharpening.
The image here shows the red channel only of a 300% blow-up. The bright object is an intensely red theatrical light. Notice the steppy manner in which the color follows the contour of the edge. The right image is of the same detail after the red channel has been corrected by the filter (but before the sharpening routine was added).
More tips will follow. Enjoy.
-iNova


 Get
the eBook
Get
the eBook