| Home |
News:
Eratta: Diffraction science description update here. Up Data: PS CS3 Notes: Photoshop evoles. CS3's need for the telephoto Action iTelePanoSetup is zero. It won't do squat for you in CS3. PS CS3's version of Photomerge is so well implemented that it solves 99+% of your panoramic assembly needs. Just run Photomerge with the Telephoto example images and use "Cylindrical," "Add Open Files" and make sure the "Blend images" box is checked. Boom! Instant perfecto pano. If you shoot panos--even hand-held--Photomerge CS3 is close to perfection. If you get an image that somehow fails to line up right (usually due to parallax issues), then Photomerges's option to "Reposition Only" may get you close enough to manually tweak the sides into alignment with the center. At least for a three-part pano.
This one is from the examples in the D80 and D200 eBooks. Hand-held, standing on a rock ouside of Taos, New Mexico. CS3's Photomerge has found a non-obvious, but well-considered path through the shots and on close inspection, no flaws of stitching are at all obvious. Rollover this shot to see the exotic paneling that Photomerge has achieved. MAJOR RAW POWER NOW HERE! AND YOU CAN NOT BEAT THE PRICE!
It's a special version of Uwe Steinmueller and Juergen Gulbins' The Art of RAW Conversion specially targeting Nikon NEF files. Future copies of DSLR: Nikon D200 will include it under the RAW Materials link. Today, you can receive this volume for the lowest possible price: Free. But only here and only to current D200 eBook owners. It contains over 200 pages of valuable RAW workflow and converter information for ACR, Adobe Raw Converter, Nikon Capture NX, LightZone and Apple Aperture plus Adobe Lightroom. Since it is so large, you will have to download it from here. Please check back then. A special button will be here for the download.
There Is Always More To Learn Department This is just a guess, but I think that when digital photography was new, a lot of film photographers thought it would just be some sort of fad, and if they held their breath long enough, it would blow over. That has turned out to be NOT the case, and Nikon, Canon and others have ground their film gears to a halt starting in 2004. No more 35mm SLRs will be developed.
Other photographers, such as Uwe Steinmueller, recognized immediately that the D-word was the direction photography was evolving into, so he wasted no time learning everything possible about it.
Uwe wrote the RAW Materials volume included with the D80 eBook and, of course, the special download offer hinted at above for current eBook owners. As a Nikon photographer, it will add greatly to your understanding and use of RAW format images, but there is always more to learn. His books on Digital Fine Art Printing, RAW Conversion, Fine Art Photography, California Earthframes and Digital Photography Workflow can take the serious photographer far forward in persuit of excellence. As an owner of the D80 eBook, you can obtain many of Uwe's publications at a nice, satisfying discount. Visit this special page for details. Bon Aperture, -iNova, January, 2007 176,000 Words Later Department: This is worth reading through. 11/06 When we write these eBooks, it really isn't writing in the classic sense. It's a totally interactive process of what to say, where to place it and how to illustrate ideas all jumbled together. The editing process is fierce. Too often editing one area can precipitate an error elsewhere. Hence the errata section that follows. As you can see below, sometimes mysteaks happin. But that's all over now. Version 1.1 of the DSLR Nikon D200 eBook is out now with all known errata flattened, and if any owners of Version 1.0 wish to update to the newer, cleaner version, send your old CD to us with a self-addressed CD return mailer, and we will shoot you a new one for free. Thanks to all who found these bugs so we could squash them. In particular, Reed Markley, who has the sharpest eyes on the planet. Even if you have one of the newer versions (shipping since before Thanksgiving), read through the stuff below. We have added news and expanded detail. I think of errors as opportunities to learn, so you may find some extra gems in what follows: Errata in Version 1.4: 1. If your links don't open RAW Materials from Adobe Reader, it's because the file name is run together as "RAWMaterial.pdf" when it should have been "RAW Materials.pdf". So the easy fix is to add the single space between RAW and Materials to the copy on your hard drive. Errata in Version 1.3: 1. Egad. Page ix (Meet the Camera's second page) somehow has the Nikon D200 title reading as "Nikon 200D," making it all sdrawkcab. The fix: ignore it. You know what your camera really is. I think this got started with the Canon cameras. They put the D at the end of their model numbers, while Nikon puts theirs at the beginning of the model name. Sometimes we get confusticated. Errata in Version 1.0: Sure enough, even though we have been pouring through all the details in this project for seven months, a number of errors crept in. In the Acknowledgment page I said, "I speak with typographical errors, so it comes as no surprise that I write that way." Call them "verbographical" when spoken, but we have found a bunch in the text. None are harmful, but anything that breaks your concentration is not good. Here are the corrected items, often with some commentary that didn't make it into the eBook. Future dupes will be free of them, and if you wish to have an updated CD, drop me a line. N.B: Not all errors appear in all dupes. Page 5-26: The frames chart is simply wrong. The correct one looks like this:
Page 9-19: The hyperlink to the D200 Web Gallery is wrong. The highlighted link goes to a different Gallery. The written link is correct as text, but the hyperlink doesn't connect to that URL. Here's the correct link: http://www.digitalsecrets.net/D200/ just the way the text shows it. Bad math: Page 4-71 "But the GN doubles as the ISO increases by 1.414X." Not so. Exactly sdrawkcab. ISO must increase not by the square root of 2 to double the GN but the square of 2. In other words, when GN goes up by 2X, it's because sensitivity has gone up 4X. Every time the Guide Number doubles, the f-stop it tells you to work with is now half the diameter of its previous setting. In feet, the GN of 42 for the camera flash equals 10 feet at f/4.2. But for a 10 feet at f/8.4 exposure or GN of 84, sensitivity must go up by 2 stops to account for the aperture that only passes 1/4th of the flow of photons. How many of you spotted this glaring error? I think what I really meant to say was that as the ISO increases by 1 stop (to 200% of its previous number), the GN lifts by 1.414X. With manual power dialed as low as 1/128th power, a fast f/1.4 lens will shoot at about 30 inches from the flash tube (0.8 meters). GN at this extreme is 1.18/3.8 @ ISO 100. Bad math, but the right bottom line: Page 4-144 tells the tale of Diffraction. The example is give of a 200mm optic versus an 18mm optic, both stopped down to f/22. At that small aperture the 200mm lens has a hole 1/22nd of its focal length, or 9.1mm. The circumference of the iris is 28.6mm, being the product of the diameter times pi. (9.1 x 3.141.. = 28.6) What wasn't included in the text was the AREA of that aperture which is 65 square millimeters (radius squared times pi). The text claims this ratio to be 1.38:1 which it is not. Divide the area by the circumference and the factor is really 2.28:1. For the 18mm lens, its aperture is only 0.82mm across with a circumference of only 2.6mm. Its area is 0.52 square mm, thus the ratio of area divided by circumference is 0.21:1. Somehow I tortured the numbers in entering them onto the page (I cut the pi with a dull blade), but the conclusion is correct and valid: the longer focal length lens has 11 times more clear aperture to circumference, comparatively, than does the shorter 18mm lens. (2.28 compared to 0.21) And that was the whole point, anyhow. With the proportionally larger clear area, 11 times as many photons fly through without being swerved off course, and the image is more diffraction-free than with the 18mm focal length. Photons are huge compared to atoms--several thousands of times larger--but they're not hardballs. I think of them as rather fluffy, easily influenced by matter, soft enough to slam into things without exerting much force (unless you're an electron) and ready, willing and able to twist, bounce, be absorbed or be generated, zipping off in a nearly straight line as fast as can be. Thank goodness they're plentiful, or the D200 wouldn't have been born. Generic Typos (and a hearty thanks to those who have spotted them for me): Page 1-20 (36 of 486); "Check the ." the word Appendix has vaporized. The Appendix page with external storage devices and links to their sources is Ax-3. Page 2-3 (43 of 486); The word Later (mid page) is a link to page 4-126 and the technique is to use a shiny tin lid from a squarish sardine can (smoked oysters, etc), as a reflector to take the camera flash up above you. At higher ISOs, this turns the camera into a bouncer without an external flash. Low ceilings only. Not for ballrooms or tall rooms. Page 2-3 (46 of 486); The word later (bottom of first column) is a link to page 4-77 where the Flash FP option is discussed. If you have an SB-800, you will probably use this setting most of the time in Manual and Shutter Priority exposure modes. Page 4-10. "Every photon is one solid pure of one physical wavelength." No, no, no. "Every photon is one pure mote of one physical wavelength." --would be closer to the Truth. Photons are fascinating, if not ubiquitous. Every one of them is the smallest bundle of energy that can exist at its wavelength. Every one is a single pure color of one wavelength only. Wavelength and total energy are intrinsically linked. To make them stronger is to squeeze more energy into a smaller wavelength. Page 4-54 "Optionally you can import a Custom tonality curve from Nikon View software (sold separately)." Almost. What it should have said is, "Optionally you can import a Custom tonality curve from Nikon Capture software (sold separately)." Note also that Nikon Capture 4.4 which was available during the composition of this eBook has been replaced by Nikon Capture NX, which costs more and only does image editing functions. In the transition to Nikon Capture NX, the ability to use Nikon Capture to remotely control the camera via a USB cable has been lost. Or at least has been shoved into an extra-price optional bit of software called Nikon Camera Control Pro for an additional $50. Does anybody remember the Good Old Days? Sigh. Page 4-54 "Since you don’t know the internal Auto formula, you will either benefit from switching contrast to 0, Normal." Delete the "either". To expand on the idea, by setting Tonality (contrast) to 0, Normal will give you a solid starting place for edits later on. If you set it to other options, make sure you check your histograms as you work to confirm that the placement and distribution of tonalities is where you expect to see them. Page 4-55. An extra sentence fragment has crept in. "Since emphasis can be given to..." Huh? Delete this from your retina. But to expand on the notion: RAW images are never just B&W, but by shooting them in B&W mode you will see them on your monitor as B&W, you can rather plan what to do with them in editing. Later, during interpretation you can change the RAW image out of B&W, save it in 16-bit form, then apply Channel Mixer controls to the result, for a monochrome color-interpreted result that has the look of B&W film's panchromatic response to colors--and even manipulate the RGB channels to produce a color filter effect. P
Page 4-80. The image rollover should be like the one in the previous item. Commander mode. Here's a better caption: "e3 Commander Mode is flexible in the extreme. You control the camera flash plus two SB-800/600 speedlights wirelessly. The remote units can be set to a wide range of individual behaviors, and may be fine-tuned from the camera’s menu." Page 4-120. Lysdexia. Okay, so I get Nikon Capture and Nikon View mixed up. I'm almost never using Nikon View, nor referring to it. Yet my fingers keep saying it over and over. Think "Nikon Capture." BTW, if you haven't tried Nikon Capture NX, you owe it to yourself to play with the Demo version from Nikon. Page 4-123. The hyperlink to Green Clean USA has evaporated. Try this one, instead. It works today. Page 4-136. Here's a better paragraph for the fourth column: In other words, the trick that the SB-50DX has up its sleeve is that it fires for the same tiny fraction of a second that the camera flash takes up. If you were to set the camera to a manual flash duration, the SB-50 will mirror it in time, thus issuing proportionally only a similar fraction of its full output. Since it's a brighter flash to begin with, it tends to dominate the illumination of the subject, with the camera flash now showing up as a fill light. I don't know if this is true, but I rather suspect that when Nikon's flash designers came up with the circuit that took its flash duration (and therefore power output) from the on-camera flash, it led eventually to the extraordinary pulse-code signaling that makes the SB-800/600's so amazingly intelligent. This feature is not a good reason to go out and buy an SB-50DX, but if you were to pick one up used for $40, it could be useful. Page 4-142. Where does the NEF Plugin show up on your computer? Here's some help for Windows users who I may have confused, as provided by photographer Reed Markley who has been helpful with these errata:
It's a shame that Nikon Capture isn't more forthcoming about how it is going to affect your computer system. Instead, it seems to follow a philosophy of "Take the machine over to do what is best for Nikon Capture and let the user figure out why things have changed on their own." Page 4-148. The Reviewers link is no longer valid. Forbes has recycled this into a more current article. Basically the gist of the original article is that both the Dell and Apple 30-inch displays are worth your attention. Image quaility is virtually identical and brightness is the same--plenty too much. For digital photographers like you and me, these are the most satisfying screens we can attach to our computers. Page 5-16. Small clarification: Some zoom lenses show the uncanny ability to do focus at full tele, holding that well when they widen out to intermediate zoom positions--and this is the new information--only when the tele reading is done on a more distant subject. Infinity focus seems to be the most common focus-holding point, but I have achieved excellent results with the Nikkor 18-200 when the focus subject is in the 30+ foot (9 meter) range. Trying to hold focus with closer subjects doesn't work. Zooming out from tele causes considerable focus drift with subjects 10 feet (3 meters) away. Page 5-22. A reminder: Prices quoted here and elsewhere were from sources active at the moment that part of the manuscript was being written. No prices were entered without having at least one published or Internet source available at the time. The only thing constant is change (attributed to Francois de la Rochefoucauld in the 1600s, which itself was something of a change, since Plato attributed it to Heraclitus who said "everything flows; nothing stands still" some dozens of centuries previous). The same goes for links. Page 5-23. Pressing the checkerboard button and scrolling with the Main Command Dial must both be done to see the multi-thumbnails. Repeat presses alond won't do it. Page 5-24. Protecting must be done with the button that has a Key icon. Printing directly from the camera or CompactFlash card is only possible if there is a JPEG image for that shot. RAW-only shots won't print. Page 5-29. Somehow stitching images together was attributed to Nikon Capture. Oops. No, it won't do it. Photoshop and Photoshop Elements hide their stitching utility, Photomerge, under File > Automate > Photomerge. Here's a recent fun link. Page 5-48. Incomplete sentence. Here's the complete idea:
Page 7-2. Oh, the pitfalls of cut and paste! Some references to the WRONG CAMERA didn't get expunged. Of course we mean the D200, so pay no attention to those bogus camera models. I'm buying a new sponge. Page 7-14. Just for clarity's sake, not all inkjet inks run when damp, especially the pigment-based inks for printers like the Epson PictureMate and StylusPro models and big guns like the HP Designjet Z series. I like Peter Marshall's take on it, paraphrasing into iNovaspeak: Page 9-3. Inverted sense. In column 2 the correct idea is, of course:
Page 10-2. Type truncated in boxes. There they are, on the right. Page 10-16. The reference to iTintCool is really means iBWCool, as in the other references on the page. Page 10-25. LensBaby's address has changed. You probably guessed that. Page 10-38. One reader noted that the link to my mailbox wasn't quite right. Do you have any such problem? My direct eMail is: peter.inova@mac.com and this should work on any browser or eMail program. If not, please tell me your experience with the link. Note: Chapter 11 here is the first time Photoshop Elements data has appeared in a Nikon eBook. I adapted this from a previous eBook for the Canon 20D and somehow I've missed some references to that camera. The data is perfectly valid for the D200 and its images, but some references didn't get changed. Sorry about that.
Page 11-1. Wrong picture. What was I thinking? Here's the right image, above, (smaller by far) showing the original 18mm shot with overlay lines that reveal how far out of whack the barrel distortion makes architectural subjects. Rollover to see the image corrected by PSE and a simple Pinch command (-7). Click to see it without the lines. Not bad at all. The iNovaFX iBC Actions do a more complete job, but this is a definite improvement. Page 11-2. Missing line at bottom of text box. The whole thing is: Note: Some forms of CA can only be corrected in digital images by manipulating individual RGB channels. iNovaFX Actions exist to give you control over these but are only available for the full versions of Photoshop 6, 7, CS and CS2. See Chapter 10 for details. Notice that the numbers in the Barrel Correction Techniques box missed a detail. That last line isn't for the 12mm setting of the 12-24mm Nikkor, it's for the 24mm setting. Page 11-4. Numbers. The numbers in the caption are wrong. They're really for ISO 6400 and 12800, not 3200 and 6400. Really, they apply to +1 and +2 -stops of brighter images. Page 11-14. PSE Presets (continued). Minor detail. The comment about the image on the top left of the page should have said "Above is the Stamp Filter effect made after resetting the Swatches to black over white." Instead, it directs you to the right, and there is no image on the right. Page 11-15. Step 3. Make the circle 3300 pixels in diameter. Feel free to change this from 2900 to 3600 pixels, or whatever works best for your image. It's one of those variables you can tweak to taste. Page Ax-7. Here's a whopper. There is NO reset button on the D200. In fact, this is a leftover from other eBooks, and should have been exised. Here's what it should have said: If you are confident that the power supply isn’t the cause of a problem, switching the camera off and on may be enough to wake it up, but if that doesn’t do the job, open the battery door and fully disconnect the camera from all power for five seconds or so before restarting. No good? Two-button Reset is your last resort. Press QUAL and EV± buttons together for two seconds and a number of settings return to their Default state while the camera re-boots in the same way that a computer that has crashed re-awakens. It starts from scratch with factory presets installed in some basic options like ISO 100, WB Auto, Center focus zone, BKT, QUAL > Large/Normal, EV and FV settings. Custom settings are not affected. Page Ax-8. Missing is. Here's the idea: Program Exposure mode. Since this automatic exposure computation is coordinated, it may reveal problems that the other modes may not. Other typos may appear here as the clock ticks. If you spot anything odd, weird, wrong or obviously inco ...then contact me directly: peter.inova@mac.com. Actions Sneeze! iHaloCS2 -- The Issue: The Fix:
One of the items in the first 12 in the list is labeled "Set Custom Shapes of current application" and this is where the trouble is. If this line item is checked in the extreme left box next to it, that means it is active--and it shouldn't be. Simply un-check that item, leaving the box empty. You have to do this for all 7 of the numbered iHalo Actions. It takes about five seconds to open each, spot the instruction, make the change, then close it back up. Once you make this small change, quit out of Photoshop. Doing that causes any changes made to any Action to be remembered by Photoshop the next time it opens. Reopen it immediately and check to see that the Set Custom Shapes items have remained unchecked. Now the error messages will not appear. If you really need a fresh set of these actions with that instruction removed, email me. NOTE: iHalo Actions expect to see a freshly loaded image that was saved before the iHalo Action can be run. This means that if you have run other Actions before running an iHalo variation, the name structure may have changed so Photoshop doesn't call the final remaining layer "Background". Finish your work. Save the final image. Re-open it and notice that the original layer is now called "Background," then run the iHalo Action of choice.
Klaus Nordby is a designer, photographer and Photoshop whiz who has come up with a clever variation on one of the iNovaFX Photoshop Actions that helps you compose and/or frame images. You may remember from Actions class that the iHandyChanges folder contains an Action called iRuleOfThirds which superimposes a non-destructive grid of lines over the image to help you estimate how the composition is lining up. The overlay lines can be blinked on and off at will, occupying a layer that doesn't connect to the image. Klaus favors a grid based on the Golden Section which is an ergonomically pleasing, mathematically exacting means to achieving proportionality that seems to resonate with human perception particularly strongly. And wouldn't you know it, the Ancient Greeks used it all the time, and not just for fun. Da Vinci, it is said, arranged the composition of the Mona Lisa using Golden Section proportions. No, he's not an ancient Greek, but he is famous for saying "You have to draw the line somewhere." And he knew a Good Thing when he saw it. The essential tic-tac-toe -ish grid is there, but the lines highlighted in the Golden Section illustration above are what are used in place of simple thirds to divide the image. Click on the lettering to open the Actions Download folder. Save the linked file iHandyChangesByKlaus.atn file to your desktop. It may show up as "iHandyChangesByKlaus.atn.txt". Lop off the ".txt" and it will magically turn into a Photoshop Actions file. Drop that onto--or open it from inside-- Photoshop, and try it out. New B&W Actions As has been noted in the press, I'm at work on DSLR: Nikon D80. We hope to have it out as soon as possible, since this camera is such a delightful handful. This title goes on sale December 4, 2006 for holiday delivery. The D80, it turns out, has an expanded B&W shooting mode that includes in-camera color filters that act the way that color filters do when used with B&W film. No B&W film is colorblind. Early emulsions (think 1800s and early 1900s) were particularly blue sensitive and red-blind, though. Pink skinned people ended up looking a tad sunburned and skies often looked overexposed. You can get that sort of effect with color filters over the lens when using modern panchromatic B&W films (pan = all inclusive, chromatic = produced by color). With a green or blue filter over the lens, ruddy faces look more contrasty. Avoid that. Blemishes stand out, since they're often 'ruddier'. But put a red or orange filter on the lens and skin looks a bit sleeker. So the D80 has this ability in its menus. Red, orange, yellow and green filters are there. Wouldn't it be nice to mimic this with the D200? Which brings me to the point. Here are some iNovaFX Actions that do just that, but you use them with color shots you take with the D200. We've even added two that Nikon didn't include in the D80--mild and deep blue. The iBWColorFiltersCS2 set is now included on the same page as the Actions in the previous article. So you download it, lop off the trailing ".txt" and then import the file into Photoshop. If you bring it into Photoshop CS, remove the trailing ".atn" from the folder name in the Actions Palette. Otherwise the Carnet group won't work. It's a Beta freebie for you to expand your capabilities with. Let me know if you like it. Actions HELP! Some Actions only work in PS CS2. Not all that only work there were given a "CS2" in their title. If you have tried to make the iNovaFX Photoshop Action "iXbloom" work in PS CS, you will slam into an error. But it works just fine in PS CS2. iNovaFX Action of the Year Department: While many of the iNovaFX Photoshop Actions are fun, useful and handy, some can make professional photographers fame and fortune. Portrait photographers will find money underneath the new iBaby and iToons Actions because they allow the post-production application of graphic and fantasy attributes. The iComplexArtFX folder includes watercolor and oil painting simulations that can sell images. I leave it to you to find ways of combining interpreted, graphic images with their underlying photorealistic forms to produce your own signature styles. New among the Actions are the iDRv3 series (iDynamicRangers folder) that take a normal image plus two severely underexposed highlight captures and turn them into a normal, plausible, completely intuitive image of difficult lighting.
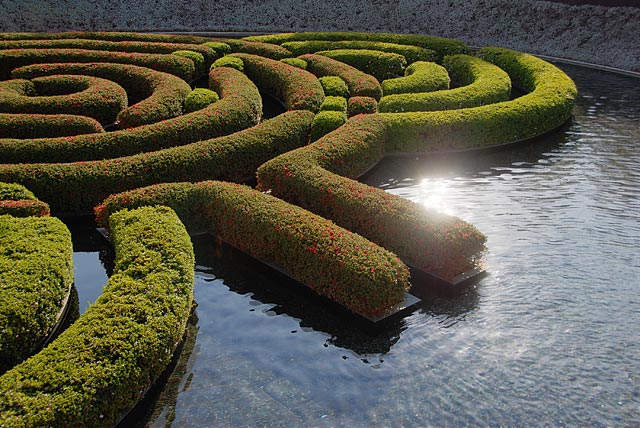
The significance of this hits home when any brightness-challenged subject matter comes before one's lens. Product photos, exteriors with wide contrast, automotive shots or anything with high-gloss surfaces that reflect lighting are fair game for the technique. Since assembling and processing is so quick, your in-the-field laptop can sort out a string of shots and show you pretty indicative results right away. Minimum BKT gathering is five shots with the base exposure set at EV-2.0. Now the exposure string shoots -4, -3, -2, -1 and 0 stops as its string of shots instead of its usual -2, -1, 0, +1, +2. The brightest is "normal". Pick the -4, -2 and 0 shots for your input to the iDRv3 Action in Photoshop and hit Return. It makes catching dramatic sun angles, too-bright skies, specular glints like the following one and those in the eBook's examples (Gallery page G-18) into an interactive Piece Of Cake. Recently we challenged this technique with some extremely unlikely setups--hand held with moving water as the subject matter, for instance--and shocked and amazed ourselves that it could be done 1) at all, and 2) well. Here is a sample:
Here's a reprint of our original article on this:
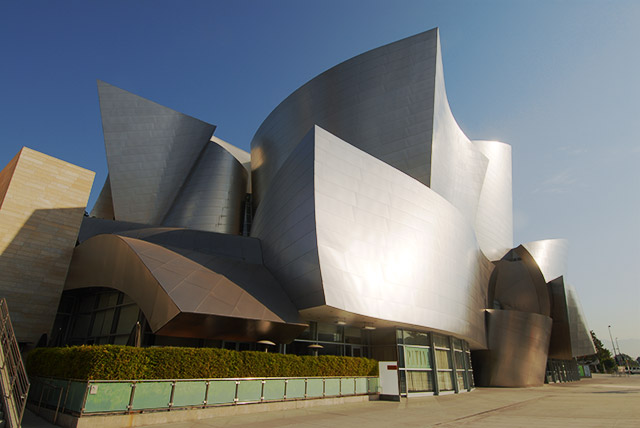
Superior to Anything Previous Department We consider PS 6 to PS CS2 to be your camera's partner in creativity. Sure, there are other editing programs out there, and all of them include interesting ways to do things that Photoshop does in other ways. Some of them even include a feature or three that Photoshop missed. Just for the record, those other programs are not the ones you'll see on a job application. The number of people who have been refused a job because they mastered Photoshop instead of some other photo editing program falls in the range of the number of thumbs you have on your right foot. A few of the things we have taught about digital photography have eventually been embodied in Photoshop's ever-expanding series of features. Here's one now. If you were to research the iNovaFX iDynamicRanger Actions, you would see that we were first to combine a string of 1- and 2-stop JPEG images together into an improved dynamic range image as far back as 2001. This is such a good idea that Adobe has now created the HDR (High Dynamic Range) process available only in PS CS2 (and higher), which automates the steps, giving interesting histogram and controls along the way. Geez, Adobe, it took you long enough... Since many people at Adobe own previous versions of our eBooks and our Dynamic Ranger technique has been on display on this site since we first showed the technique here using images from the Nikon Coolpix 950, we can reasonably speculate that they heard it here first. And in typical Adobe manner, they cooked the idea into a new super-tonality format that seems to top all previous dynamic range imaging techniques. It's 32-bit and takes up a lot of room in storage, having two whole bytes per pixel tracking each RGB channel in scrupulous bit-perfect numerical exactitude. In fact they call HDR images RRGGBB just to get the point across. Presumably, it's perfect, right? Numerical perfection beats a full house of great looking imagery every time, right? iDRv3 New in the DSLR: Nikon D200 eBook is our own special improvement to the Dynamic Ranger Actions that exceeds Photoshop's HDR performance by significant leaps forward. Particularly in relation to images you can generate, manipulate and use for practical--sellable--results right in the privacy of your own computer. Case in point: The extremes of highlight control: What's wrong with this picture?
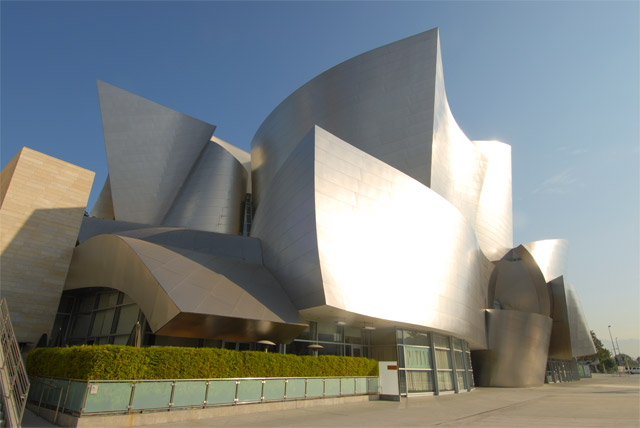
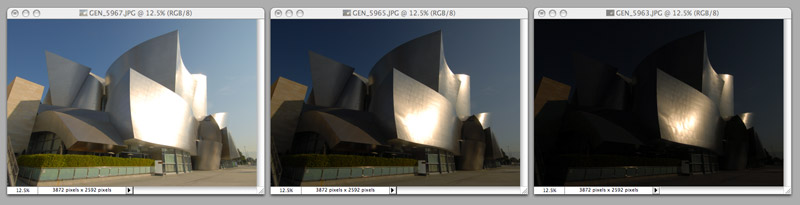
I'm sure you can think up plenty of things to say, chief among them a point when it's compared to the image up on top. Shadows look nice, but zooks of gad, those highlights are completely and utterly out of control. They're punched through the ceiling, off into the 0-zone, blown through the roof and are completely without social redeeming value. In short--the highlight dynamics are Bad and Wrong. Yep. This is what digital photography does with the absolute worst-case visual scenario of specular super-glare of direct dawn sunlight off a stainless steel building. It's not a Nikon thing; it's a digital photography thing. And the multiple exposures one makes for an iDynamicRanger Action or for Photoshop's HDR image process potentially hold enough dynamic range among them to fix the issue. Since shadow detail is not nearly as much of a problem, we have concentrated on exposing for Normal tonalities in the shadow areas of our subject, along with two 2-stop darker images that seek to embrace the super-bright highlights. The trio (selected out of a very wide seven-stop bracket made with the D200) looks like this:
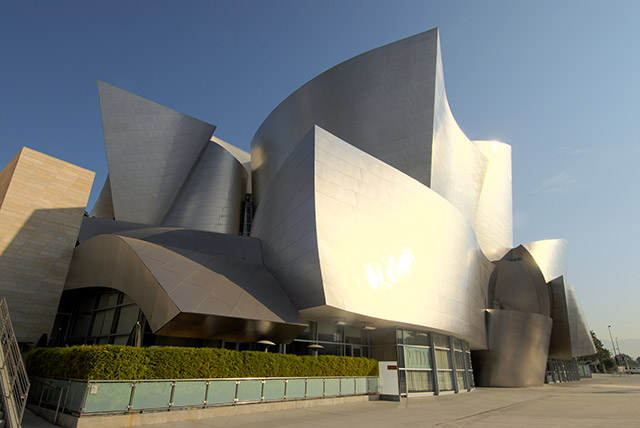
Can you tease these back into a high-dynamic range single image? Yes. Just not with Photoshop's HDR process, though. These three original images were used to create the top image with iNovaFX Photoshop Action called iDRv3toTaste16-bit. It's the newest third-generation Action, and it creates a native 16-bit result. Included in the new eBook are 8-bit and simple variations--three in all. They run fast--many times faster than Photoshop's HDR processing--and they give you exquisite control over each layer as you put the picture together. You make the call as to what the result looks like visually as you work with the layers. In a sense, you get to exercise self-evident control over the appearance of the subject in non-destructive ways. We took the same group of shots into Photoshop CS2 and told it to "go ahead--make my day," using the HDR process and this is what it did:
Exploring all of these options and after trying dozens of settings we discovered that the idea "can do" is apparently equivalent to the noun "dice." Because in this instance no can do equated to no dice. This was the best it could do using the Local Adaptation option:
This isn't even close. Mid tones are fine, but no amount of tweaking, white point adjusting, Gamma, Exposure, Highlight Compression or post-conversion to 16-bit or 8-bit Curves adjustment could rid the image of that horrible yellow highlight effect and posterized top highlight. We challenge anybody on the Adobe Photoshop development team to take the same three images and produce a result more like our own (pleasing, intuitive, directly useful for printing) using the current version of HDR routines found in PS CS2. As part of the challenge, you must articulate exactly how your written instructions were NOT followed and how obviously we erred in applying your software to the images in question. At best, we can say that it kept subtle sky colors a bit better but the image never got close to the gradual, neutral and what's more--plausible--highlight effect that the iNovaFX Photoshop Action achieved in both 16-bit and 8-bit image versions. Just to make sure we weren't blowing smoke at the idea, we ran the same cluster of images through CS2 using the new iDRv3toTaste16-bit Action (it was developed on, and works with CS, while the 8-bit versions work fine with PS 7) using the tonalities we liked from the HDR example as a guide. Here's that result:
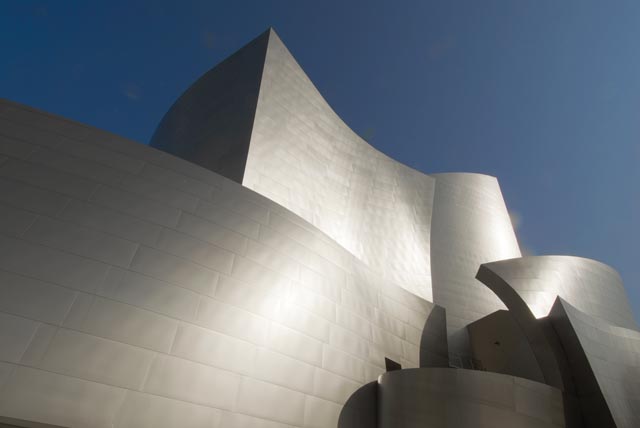
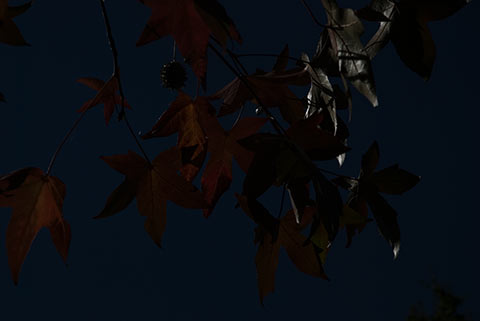
Any time you merge a bunch of images together, a new factor creeps in--interpretation. That's where you come in. There is no substitute for the eye of the beholder. Shadow tonalities here are purposely closer to imitating those of the HDR image, which itself could have been interpreted a number of different ways. Our original version favored more open shadows, as you can see at the top of this page. One thing is for sure: With the iNovaFX Action, you get to SEE what you are doing and achieving at every step of the process and at no time do you experience anything like the Yellow Glare flaw that Photoshop's HDR process seems to make inevitable. Question number one on many people's minds is this: Well, hey, can't I get the same thing out of a RAW picture? And I'm the first to wish that it were possible to do it so simply. But those full-blast highlights are 1600% brighter than the highlights in a normal exposure--well outside the nominal 1.5-stops (about 300% better than JPEGs) of correction one reasonably expects from an appropriately exposed RAW image. In short, the iNovaFX iDRv3 series lets you gather shots like this that are somewhere in the realm of 530% more controlled in their highlights than you can expect from RAW images. Shots of cars (extremes of finishes that respect gloss, metallic paint and rich highlight detail), extraordinary skies (where back-lit silver linings meet delicate shadows and brilliant sun discs), architecture (like the above) and previously forbidden high dynamic scenics (where balancing skies against foreground detail) are now within reach. The only requirement: a hands-free trigger of the D200 for a ±1.0-stop 5 to 9 shot bracket from a tripod. Plus the eBook's iNovaFX Actions, of course. What previously had been two words: "im possible" has now become "I'm possible". What a difference an apostrophe can make. Any shot that needs brilliant highlights in concert with decent shadows is where the new iDRv3 Actions will help you. Goodies Department: Never resting, there is a new iDRv3 Action that didn't make it into the eBook, but if you wish, you can contact me directly for a copy. It's called iDRv3toTasteSuper and adds several controls to the layer stack so you can make gross and fine color adustments more freely and/or more selectively. I've used it on this image of the Disney Hall and adjustment was quicker and more pleasing than with its predecessor. The three shots were these. The gold color is due to a slightly off-center custom Preset White Balance in place during the intial image gathering. This phenomenon is likely what caused Photoshop's HDR process to fail so miserably with these shots, but hey, isn't that process supposed to be "better" in many ways?
With the new Action in operation the result, plus some tweaks to sky color, looks like this. The body of the building is exactly as it appears from the Action's adjustments.
To obtain your copy of this Action, start a conversation with me via peter.inova@mac.com. You'll have to answer a question or two, then I'll eMail you the Action. -iNova |
||||||
 |
|||||||
|
Feature Breakthrough: In-camera RAW ISO expanding.
So in your camera you have this NEF file, and you can bring it into Nikon Capture NX or Photoshop and lift the exposure, but what if you could lift it IN THE CAMERA to ISO 400 or 1600 or 6400 so you could show the Sheriff that you weren't completely mad? Can do. Here's how: 1. Dial in Shooting Menu > Image Overlay. This allows superimposing two RAW shots and balancing their relative strength in order to create a new image.
2. In the dialog screen fill both Image 1 and Image 2 with your underexposed original RAW shot.
3. Lift the exposure factor below each image from x1.0 to x2.0.
4. Save the image as a RAW file.
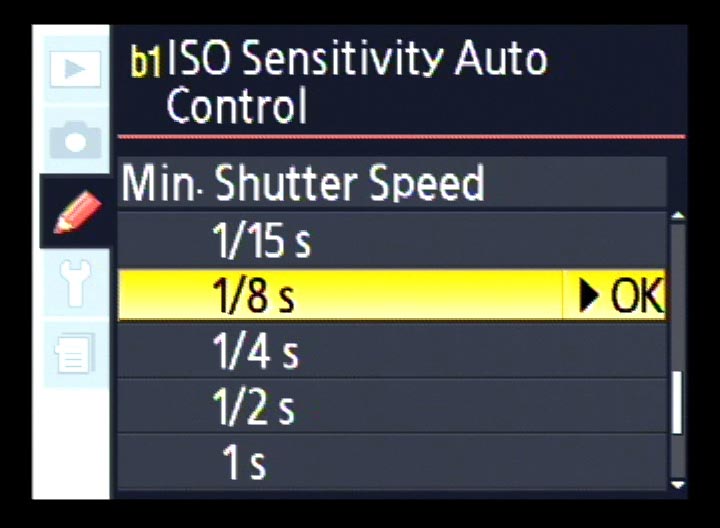
We discovered this technique only recently while fiddling around with the same feature on the newer D80. Professional photographers, take note: Your back up camera could easily be the D80. Feature Emphasis Department: Auto ISO Various D200 features are more or less important to different photographers, which is only right. Some will favor shooting in P mode and others nearly always in M. I shoot mostly in JPEG and Uwe nearly always shoots RAW, and that's why all those features are in there--to let you decide things for yourself. Here's a suggestion I pass along from a photographer who is particularly fond of the Auto ISO option: Get to Know It.
The feature is set with CSM b1; ISO Sensitivity Auto Control, and its options include the ability to set a maximum ISO that the camera will be allowed to reach for along with a maximum shutter duration that you wish to impose. If you're shooting sports, kids or pets in motion, you might wish to limit shutter speed to 1/250 sec. If you're shooting scenics at twilight with a VR lens, you might set shutter speed to a maximum of 1/8 to 1/30 sec. Internally, the camera will respect the target ISO you have set with the ISO button or through the shooting menu ISO Sensitivity selection [Shooting Menu > (5 clicks up) > 100 ~ H 1.0] until the auto exposure system reaches the minimum shutter speed. If you have set ISO 100 and 1/8 sec, the camera stays at ISO 100, adjusting f-stops and shutter speeds until the exposure solution has opened the lens as far as it can go and thinks it needs more time to make a proper exposure. Instead of increasing shutter time, it increases ISO. Allowed ISO increases span from 200 to 1600. Given the noise characteristics of the D200, setting this option to 400 or 800 is prudent. That gives you +2 to +3 stops of grace over ISO 100, but only when push comes to shove in the shutter speed requirements. Any need beyond that leads to an underexposure. Of course in A or S modes, the ISO lifts automatically once the walls of Aperture or Shutter speed alone are bumped into. Why would you give up ISO control so cavalierly? Grace. Expansion. Low Maintenance. Not to mention convenience, a sense of relief from the tedious pressures of having to be aware of everything and/or simplicity. When you gracefully expand the range of proper exposures, the camera presents a lower profile of required interactive maintenance to achieve pictorial results. Getting the picture at all is often far more important than getting it at the lowest noise chosen for a given ISO. SUPER TIP: Photoshop RAW interpreter combined with Smart Objects. Photoshop CS2 is the only Photoshop that opens D200 RAW images directly. Other versions can do it with a little help from Nikon Capture, but that program (NC NX) is a hundred and fifty bucks! Thank you not very much. But Photoshop's ACR 3.3+ (Adobe Camera RAW) feature opens Nikon NEF files with great dexterity and a rich set of features. It looks like prior versions of ACR in its functions, but a new wrinkle has joined the mix in the form of Smart Objects.
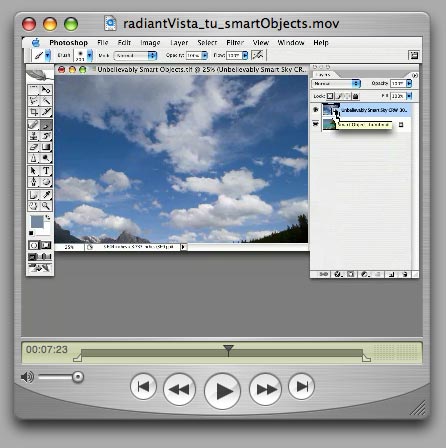
All RAW images need to be interpreted--just as all film negatives need to be evaluated and tweaked to print. The original image holds more than any final image could possibly use, so intervention must occur in order to find the image interpretation you want. Color, contrast, hue, chromatic aberration, saturation, shadow treatments--all are available, but usually you make your choices, then fiddle with the result in either 8-bit or 16-bit modes. Not Any More. Using this technique, you turn your image into a Smart Object, make your best initial guess, change things, tweak things, adjust things--then go BACK to your original interpretation and update your fundamental adjustments in order to get a better image. Here's a 14-minute downloadable QuickTime tutorial on this from RadiantVista.com: click. You may wish to jump to about 3:55 and skip some of the basics. Here's a more succinct written description from CreativePro. Once you go through these, you probably will want to include Smart Objects more frequently in your workflow. |
|||||||
| Privacy Policy: |
We do NOT distribute ANY personal data (eMail addresses, home addresses, phone numbers, transactional data) that you submit to us outside of our own internal departments, files and records. No data is distributed to any advertisers, manufacturers, businesses, other Web sites nor to our friends and neighbors.
If you write complementary comments or analysis in public forums or by direct eMail, we reserve the right to reprint abridged versions of those in our reviews, using your name as the quoted source, but not supplying any other data as part of the quote. If you wish to keep anything out of our reviews, but write complementary comments, we will honor your request for anonymity or confidentiality of subject matter and thank you very much for your thoughts. In short, submitted favorable comments are considered reprint-worthy unless you instruct us to keep the source or subject private. All personal data is never shared except within this organization. Negative comments are not made public (unless they were to begin with) but are handled on a case by case basis. Constructive suggestions may be incorporated into future or revised versions of our products with or without attribution to the source. Questions may be reprinted on this site, so that others may benefit from the answers. Let us know if your name is to be withheld. --Peter iNova |
||||||
| Contact Data: | Peter iNova peter.inova@mac.com
GM Books: gm@gmbooks.com Return address: Graphics Management Press |
||||||
 eBook owners data page.
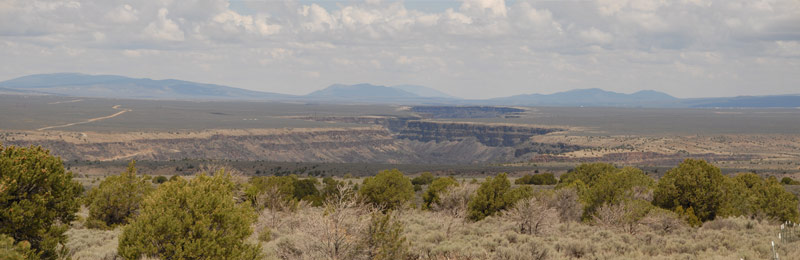
 When we produced the D200 eBook, we had a bonus in mind for readers in the works that wasn't going to be ready for the day the eBook premiered.
  Ready for your new, improved RAW Materials?
 Bad Science! Down, boy!

 If you enter a photography course that insists you learn traditional wet darkroom techniques, quick, print this page out and wave it under the nose of the registrar as you politely, but firmly, insist on a refund.
 If you haven't visited his site, you can click to it
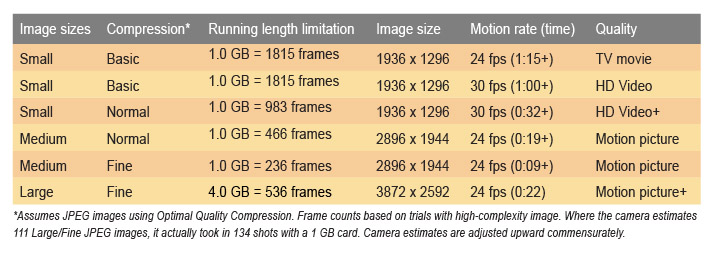
 age 4-65. Wrong image in rollover. It should have been the detail page from a7. Somehow a6 got in there. You didn't miss much.
 Page 4-77. Wrong image in rollover. It should have been the detail screen from e3. I must have been having a bad day. Here's the right menu page at left.
 Page 9-19. The URL is correct, but the link to itself is wrong. Where it says to see the instant gallery here: "
 2. A good way to avoid these cautionary messages completely, if they show up, is to open up each of the iHaloCS2 Actions in List View (this is the default view seen at the right, as opposed to Button View which shows each Action by title only) by clicking on the tiny arrow point (triangle, really) to the left of the Action's name. This opens it up so each function appears as a line item in a long list.
 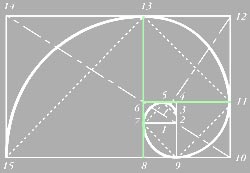 Action Refined by eBook Reader