
|
Equipment reports here are evolving documents. Return visits may reveal more information. Latest update: 9/12/07 |
$1000 for HD. It Can't Be Good. Cheap. Plastic. Sharp. Talented. Wha?
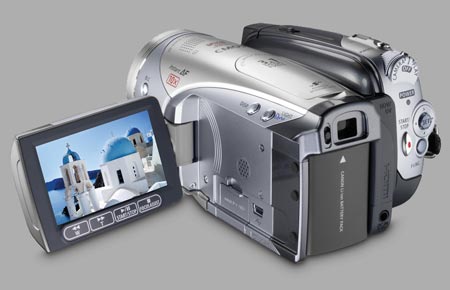
Clearly Canon were thinking of the HV20 as a consumer HD toy. Its silver plastic exterior, control layout and menu system all pander to the “I got me a HD camera” crowd, not the prosumer or professional crowd. Thankfully it contains Canon’s functional optical IS (image stabilizer) system in its 10:1 (optical) zoom lens. Fortunately, it records a superior 1080i 60-field video image onto HDV tape. The 2.7-inch flip-out 9:16 monitor viewfinder is just okay, but an internal, lower-definition viewfinder covers the same view (about 94% of the final HD image) and can be easily used in bright light.
Cine Mode Exposure automation includes Program (P), Time Value (Tv), Aperture Value (Av), Cine and Subject modes. The latter includes things like Portrait, Sports, Beach and Fireworks, each of which change several internal boundaries for particular subject categories. The Cine mode is the one prosumers and professionals will likely wish to use the most. It locks camera sensitivity at a low dB gain and sets the shutter speed to 1/60 sec (in 60-field HD) or 1/48 sec (in 24p mode). Gamma is lifted, rolling off the specular highlights more gradually while raising shadow detail somewhat. In P, Tv, Av and Subject exposure modes, gain floats with image brightness quite widely, turning dimly lit subjects into Noise City. Cine mode lowers image amplification, lowering noise and cleaning up the image considerably, but darkening the result in low light. If you want to shoot night sidewalks under street lamps, use one of the other settings, but if you want dark interiors to read as dark interiors, start with Cine mode. Custom Image Setting (Image Effect) Although it sounds like a cheesy special effect menu, Image Effect is actually a set of tweaks that will find use, once you experiment and understand them. They work with P, Tv, Av or Cine modes and can be Off, Vivid, Neutral, Low Sharpening, Soft Skin Detail and Custom. Custom provides three-stage settings for each of four image qualities: Color Depth, Sharpness, Contrast and Brightness. We wish the range of these adjustments were greater. Seven steps instead of three. With settings of -1 in Color Depth and Sharpness, images attain a slightly less-video appearance. Contrast flattens considerably at a setting of -1, but it looks good at 0 or +1. Brightness is virtually useless. Leave it at 0.
In any exposure mode, the camera’s “joy-button,” a miniature joystick on the back right, can select among several options. Downward presses loop through options, upward presses select current topics and sideward presses initiate changes. Right under it is the FUNC button used to access menus and other settings. They meant function, but its use is rhythmic and groovy, so it's actually rather funky. These two buttons get used 90+% of the time. The joy button's center press is used to SET any choice made in the menu or on the viewfinder screen. One of the options available during shooting is marked EXP and allows exposure adjustments [+] and [-]. If the light is too low, the + options can’t be achieved, but the usual tweak for most scenes will be in the -1 to -3 range. Maximum is -11 to +11, depending on the lighting. Once an exposure setting has been changed, the AE system is locked at that setting for that shot. Until you release the adjusted exposure (easy to do by simply selecting EXP again) your exposure is locked tight. Unfortunately, this lock lasts only as long as the camera remains powered. If you are feeding AC power to the camera with its included power adapter/charging cord, that could be a long time. It would have been nice for an alternative EV +/- system to have allowed you to simply darken or lighten the meter's opinion about the exposure. But that might have proven too complex for the Consumer Market this camera is basically aimed toward. So adjusting the exposure, but locking it at its new setting is one of those compromises. Histogram Exposure Evaluation In the Still Mode, set with a switch on the right side (as viewed from shooting position), you can review images immediately after taking them and see a histogram of your exposure. In Video Mode, this idea is not present, but if you were shooting where careful exposure became an issue, you could shoot a test still, view the histogram, make changes and test shots until you were satisfied, then keep those settings for the video scene. What future video cameras really need is a live histogram during setup. AV or Headphone One annoying design compromise is inherent in the AV/Phones jack. We can only surmise that the designers ran out of room for another jack. This one can either be a video + mono sound jack or a stereo headphone jack. A menu item Play/Out Setup > AV/Phones > Phones selection will keep your brain free from the completely annoying buzz of video sync in your right ear. Interestingly, your iPod earphones are great for monitoring the camera audio, but more interestingly, your iPhone earphones also work just as well. No physical barrier inside the camera prevents full insertion of this longer plug. (iPhone earphones include a mic and penetrate farther into the camcorder.) Zebra 70/100 Although the HV20 doesn’t have a completely tunable zebra setting, these markings can at least be set for face tone highlights (70%) and maximum highlights (100%) to guide you. When used with Cine mode and caucasian faces, the 70% setting can guide you into exposure adjustments that make sense. Manual WB Automatic white balance is good, but uncontrolled. Daylight, Cloudy, Shade, Incandescent (roughly 3200K) and two Fluorescent factory preset white balance settings provide more reliable, repeatable results. The Manual WB is quite wide in its range of response to bright colors. It won’t achieve linear results with high-chroma sources, often used to add a color filter effect to digital images, but it has no trouble seeing and attempting to respond to strong colors when challenged. Any color source lower than about 60% chroma should produce desired in-camera color results by manually white balancing off a color subject. Blue skies, blue jeans and blue Post It note paper all produce warming trends while pinks, reds and magentas produce green images. Manual WB produces color effects opposite the hue of the test subject, as readers of our eBooks know well. Good neutral white balance results can be obtained in any natural lighting from candles through brutal fluorescents.
Almost handy, the HV20 has a button to disconnect from Auto Focus and a knurled roller to manually achieve focus. I say "almost" because it hides behind--and is sometimes obscured by--the flip out screen. Handy: a two-second press of the button snaps the lens to infinity. Unhandy: the scrolling roller takes more effort to focus than any lens ring in recorded history. It's two Auto Focus systems (contrast detection and fast IR rangefinding in a separate, coordinated system) work well, but what do we know about all auto focus systems? Right. You WILL have a moment of whoopsie now and again. Right in the middle of a shot. Better to zoom in, focus, then lock off that lens to prevent it from skewering you. The flip out monitor viewfinder screen has an extra focus trick up its sleeve. A focus magnifier button zooms you into the shot by 200%, facilitating more accurate focus. Added viewfinder image crispening in this mode also helps you to find focus unambiguously. 24p How many people absolutely neeeeeed 24-frame, fully progressive video? Show of hands. I didn't think so. Certainly you do if this camera is going to be used for B-roll footage in your next James Bond film, but the real-world need for 24p HD video is smaller than the need for another hole in your head. That having been said. Never mind. It's here. True, progressive, 24-frame, uncompromised (other than by the rest of this camera's features) video laid onto HDV tape. It's in telecine form, meaning a constant cadence of 3-2 pull-down recorded into 60i's field rate, but scenes shot in this mode are easily decoded into discrete 24-frame results for use in movie film productions. Your own HD home TV may perform this conversion automatically without your ever noticing it. One thing about 24p. It does NOT look as good as 60i as far as smooth motion is concerned. And forget about trying to slow it down appreciably in post production. You can always turn 60i footage into great 50% slo mo playback, good 33.3% playback and tolerable 25% playback, but with 24p, any attempt to slow it down will be met with well-deserved boos. Obie Light Built into the camera's front is a tiny round Obie Light. Named for famous actress from the 1920s to the 1970s, Merle Oberon, who asked the illuminating question, "Why not put a small, low power light right on the front of that shadow-casting camera (instead of moaning about the camera shadow)?" Which they did, and which is in every cinematographer's bag of tricks to this day. Including the HV20. It is controlled by a button near the viewfinder and could not be easier to implement. However, its coverage is a round spot, slightly hard edged, purple in the middle and greenish around the faded perimeter. Most lens accessories or filters will get in its way. Nobody is accusing the HV20 of being as big as a shadow-casting, sound-blimped studio Mitchell of the 1930s, but the built-in Obie is a nice accessory, anyhow. The best part is its price: $0.00US. In some still modes, it acts as a focus-assist light. Micro Close Focus As long as you stay away from the top half of the zoom range, as defined by the graphic zoom indicator on the viewfinder screen, you can focus down to mere inches. At full wide zoom, focus can be obtained about one inch from the lens. Once the 6.1-61mm optical zoom passes about 12mm of focal length, the close focus option becomes less and less. By 61mm, the closest you can focus is about 1 meter away from the lens. Wideness In 35mm still camera terms, the zoom range is about equivalent to a 43 to 430mm zoom. For comparison, a 35mm lens on a 35mm camera is considered Basic Wide. 43 mm is not wide enough for my taste, but when has there ever been a camcorder that appreciated the twin facts that wider = better and less telephoto = less shake? A zoom lens with coverage equivalent to 24-240mm would be WAY better. Maybe manufacturers will figure this out by 2012? Check back with us then. Until that day, what you are looking for is a wide-angle converter lens of about 0.5 or 0.7 magnification.
Extreme Night One of the Subject-oriented exposure modes is called simply, "Night." What it does is to raise the gain of the image up to maximum (not a published spec, but appears to be in the 18 dB+ range), sets white balance to AWB, then starts to lengthen the shutter speed to extremely long exposures. In Tv exposure mode, shutter speed can be manually, numerically lengthened to 1/8th second per frame, with every frame being recorded four times with identical picture information. The motion of playback is extremely stuttered, but has it's own "technique-ie" look, not foreign to modern TV viewers. Night Mode blows this out of the water. Manual exposure correction carries the shutter longer and longer--about three stops longer--for 2 fps recordings at an amazingly bright (and noisy) level. Why would you want such a beast? Let's go shoot some night traffic time-lapse images. The kind that have every light painted as long streaks in the frames. Better take some ND filters, though. You can't separately dial back the gain and/or iris on the HV20. Outputs HD images can feed out of the HV20 as Firewire HDV, HDMI for monitoring, component Y, R-y, B-y and down-converted NTSC. All at the same time. The earphone jack feeds audio. What no S-video? You can't have everything.
Included with the HV20 is its iPod Nano-sized WL-D87 Wireless Controller. Unfortunately for people who work behind the camera, control is by infrared signals and the camera IR sensor is tucked away on the front of the camera, pointing forward. To use it effectively, put the remote to the left of the camera (as seen from the rear) and hold it close to the dark window below and to the side of the lens. That black plastic seen below the lens in this shot is the receiver sensor. Keep the controller within a foot or two of this sensor, especially in bright ambient light. Once you get the feel of it, the Controller works as a Start/Stop trigger, as an instant Photo shutter release and as a zoom control in Record mode. In Playback it becomes the usual transport controls including searching by date, slow, pause, reverse play, single frame forward or back and data overlay switch. Remote button layout is remedial. Meaning frequently confusing due to a regular grid of identical buttons for the most frequently accessed functions. Still Flash Yes, there is one. When shooting video, it won't blink, even when you snap a still. Which is, by the way, a Good Thing. You can capture stills with the wireless remote's Photo button. Gritty Documentary Mode Truly, the HV20 suffers in dim light. Using Cine mode to intentionally limit response, gain and grain is one thing, but if the camera can't be used to smoothly, cleanly capture images in available darkness, does that mean it's useless in the dark? Not by far. Flipping the camera into Night mode forces shutter speeds into the 15P mode (at minimum exposure), cranks the grain out of sight and inhales photons in wholesale quantities. If only you could turn this image into black and white where everybody would assume it was shot on purpose under dire conditions--- ---whoa. Wait a minute. You CAN do that. A strictly Amateur Night feature under the Digital Effect (D. Effect) menu is the BLK&WHT option. In a smart design move, Canon's feature designers made these digital effects an instant option during shooting. You can select any ONE of them and fold it into your setup, instantly. The mini joystick controller that so quickly and easily steers you through Exposure Compensation, Audio Level setting and Quick Review modes also can introduce a digital effect (if one has been pre-chosen) for the upcoming shot. If you set D. Effect to BLK&WHT, then turning shots into monochrome is a click or three away. This works well in Cine mode, too, where images acquire a nice panchromatic B&W film look. In Night mode, black and white scenes look like they were shot on push-processed 16mm Tri-X, but if your production can benefit from the effect, it's there for you. Work Flow When shooting critical scenes with the HV20, please keep in mind that it has a “look” all its own that isn't very film-like. It won’t be mistaken for a top-end HD camera, or even a three-chip HDV camera, but it will be able to gather scenes sharply and colorfully. HV20 images look better than the rest of today's single-chip HD cameras, and the HDV format hangs on to most of what they see, but getting their scenes to cut with scenes made by more advanced HDV and higher-quality cameras isn't a shoe-in. With a little brute force in Final Cut Studio’s Colors grading program, you might be able to sell productions that use this for B-roll or establishing shots. A production shot entirely with the HV20 will be self-consistent. The look of the camera is not bad and wrong, just different. HDV Technology is in a constant state of evolution. HDV tape was introduced in 2003 with the first really good camcorders in this format appearing in 2005. Canon's own HDV 3-chip camcorders, include the $9K XL H1, which is probably the best unit in this format, rivaling units many times the price. HDV is extremely compressed at 32:1. For comparison, DV is compressed 5:1 and is extremely close in visual quality to virgin video. Many camcorders are available today in recordable DVD-based, hard disk-based and SD card-based storage formats, AVCHD (MPEG-4 AVC H.264 video codec) being chief among them. As a group, the AVCHD camcorders deliver poorer visual and motion results than those from HDV camcorders. Sony, JVC, Panasonic, Samsung and Canon all are either already in or are entering the AVCHD arena. AVCHD is stored as data, so it can be viewed random-access. Streaming it from camcorder to computer can be faster than real-time. Its convenience advantages often outweigh its slightly poorer visual results. Especially for consumers with birthday parties to memorialize. HDV keeps its shots on a low-cost storage medium, mini-DV cassettes, so it requires fewer $ to store each minute of original footage in the long run. Convenience is lower, requiring real-time transfer to computers for editing, but the image is more technically correct and motion is lower in artifacts. Once transferred into a computer, all video editing these days is random-access, so that advantage of AVCHD evaporates on the front porch of the edit suite. If AVCHD were to evolve in image quality forward of HDV (AVCHD-Intra), the format would become a historical footnote. Read a comprehensive review of the HV20 here. Light Weight Travel If you are on the go with minimal physical toting limits, the HV20 comes into its own. Any camera that is smaller than a DSLR, shoots decent HD and snags the occasional 3MP still image is a contender for some sort of prize. Winner: Most Desirable Travel Companion for HV20
A: None of the above. (I'm assuming that extra batteries and tape are not at issue.) A 5-inch diameter "The Pod" ($15US-ish) is a good alternative to a tripod. It's a bean bag with a tripod screw and it works very well. But that's not what I'm talking about. Besides, this is always in my kit. It weighs about as much as a pair of socks. HD wants the camera to be steady, all right, but not static. Tripods with enough stability and a good fluid head are heavy, large and slow to use. Why not fly the camera in zero G? For less additional weight than a can of soda, you can attach the Steadicam Merlin ($800US-ish) to your HV20 and two out of three dimensions become utterly weightless. The camera and Merlin still respect gravity, but side to side and to and fro become dimensions of inertia alone. The handle under the camera can be wiggled ferociously, but the image stays stable.
The whole rig is so light and small that it fits easily in my shoulder bag. I do carry wide converter optics, but they're icing on the cake. If I could take only one thing, the Merlin is it. The Steadicam Merlin lives up to its name and designer Garrett Brown gets our outstanding achievement award. It handles cameras in the 0.5 - 5.2 pound range. Most HDV camcorders will work with it. More about this in future footage on these pages. --iNova |
|
 8-31-007 updated 9-12-007
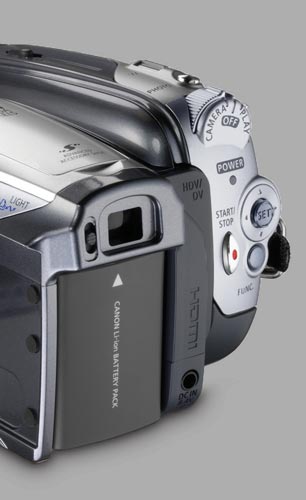 Exposure Adjust
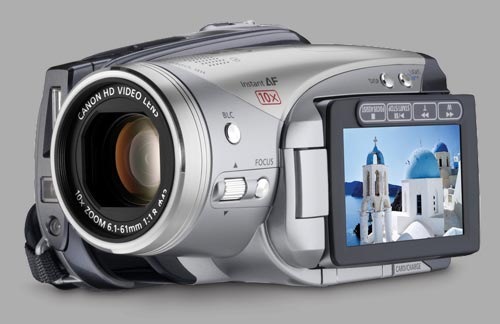 Manual Focus
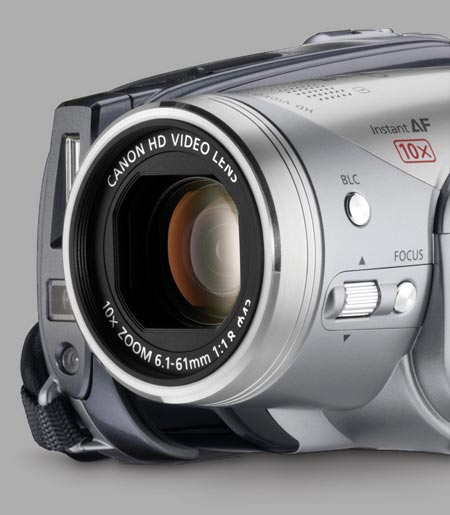 Remote Operation
 Q: If you could only take one lightweight accessory with your HV20, what might it be? Wide converter? Tripod? Shotgun mic? Hot shoe light?
  Better than any prior or alternative camera steady-support, this small wonder brings pans, booms, crabs, trucks and dolly shots to your fingertips. It easily stabilizes the HV20 into shots that you would assume were made with much more elaborate gear.
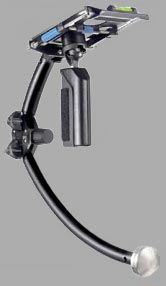 Camera + Merlin + wide lens + big battery adds only 3.2 pounds (1400g) to my running weight. Did I mention that you can run with it, flying the camera down the block?